Polymer Capillary Tubing Cutter Instruction Guide
by
IDEX Health & Science

Instructions For Cutting Your Tubing with the A-350
- Insert your polymer capillary tubing into the appropriately-sized Silica SealTight™ Tubing Sleeve
- Using the Black Fingertight Fitting included with the Cutter, insert the sleeved capillary tubing through the Fitting, ensuring that it extends well past the tip of the Fitting.
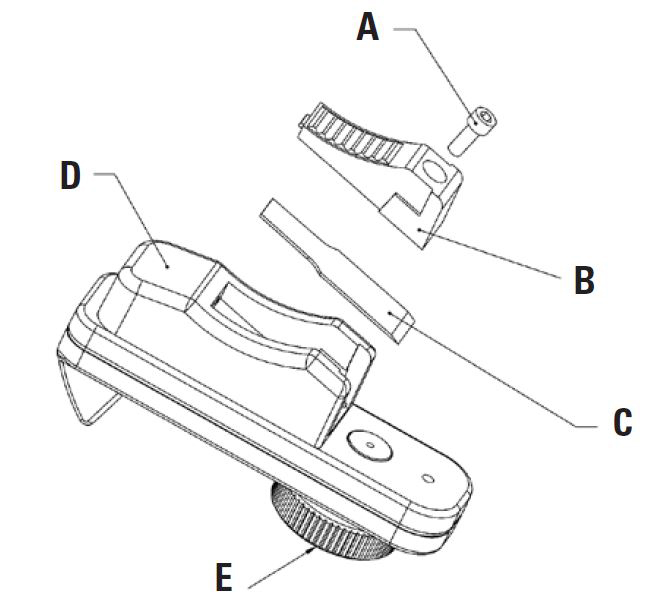
- Finger tighten the Fingertight Fitting into the Gold Thumb Wheel (E), ensuring that at least 2mm of the sleeved capillary tubing extends past the Blade (C) and that the capillary tubing is being held securely in place.
- For a clean, square cut, begin turning the Gold Thumb Wheel, and while doing so, slowly push the Blade through the Tubing Sleeve and through the capillary tubing until the capillary tubing has been completely cut.
- Loosen the Fingertight Fitting and remove the sleeved polymer capillary tubing from the Polymer Tubing Cutter. Please Note: It is the tubing being removed from the Cutter in this step that will have the properly-cut surface on its end. The tubing initially cut off in Step 4 should be discarded.
Blade Replacement Instructions:
Over time, use of this cutter will dull the Blade, making replacement of the Blade necessary. Use the replacement Blades packaged with the Cutter and follow the instructions, below:
- Loosen the Socket Head Screw (A) approximately two full turns by unscrewing it counterclockwise, using a 7/64" Allen Wrench.
- Slide the Wedge (B) forward to completely remove it from the Slide (D). During this action, the Blade (C) will also become detached from the Slide; remove the Blade and set it aside.
- Install the replacement Blade by placing it into the cavity in the Slide, with the angled cutting surface of the Blade facing up and the stamped text on the Blade visible. Make sure the back end of the Blade is flush against the rear of the Slide and snug between the guides on the front of the Slide.
- Replace the Wedge in the reverse order of the removal process, but with a slight downward pressure on the Blade. Turn the Socket Head Screw clockwise until the Blade is held securely in the Slide.
Please Note: It is important to not overtighten the screw. Overtightening the screw may result in improper function of, or damage to, the Cutter.