Micro Valve Injection Port Adapter Instruction Guide
by
IDEX Health & Science
To install the Injection Port Adapter onto a Mounting Bracket
Please Note: If Panel Mounting this Injection Port Adapter, drill a 21/64” hole, 1” from the center of the Valve Rotor Shaft Hole and about 1/4” below horzontal center; install following these directions.
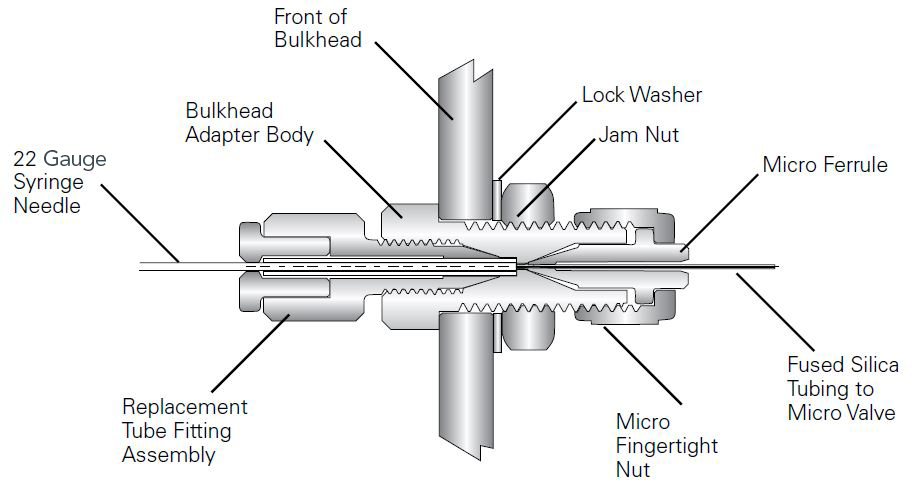
- Remove the Micro Fingertight Nut, Micro Ferrule, Jam Nut and Lock Washer from the Bulkhead Mount Adapter Body and set aside.
- Insert the externally threaded portion of the Bulkhead Mount Adapter Body through the hole from the front of the Mounting Bracket (see diagram).
- Thread the Jam Nut with the Lock Washer on the externally threaded end of the Bulkhead Mount Adapter Body. Finger tighten the Jam Nut until the Lock Washer is completely pressed against the Mounting Bracket, then tighten 1/8th of a turn with a wrench.
- Slide the Micro Fingertight Nut and Ferrule over the 360 micron tubing so the tubing extends past the ferrule by approximately 1/2”. Place the tubing with the Nut and Ferrule into the Adapter Body and screw the nut in place finger tight. Connect the other end of the fused silica tubing to port #6 of the Micro Valve, following the Valve’s instructions for the attachment of tubing.
To use the Injection Port Adapter
- Insert the syringe needle through the end cap of the Replacement Tube Fitting Assembly until it stops.
- While firmly holding the syringe in place, tighten the Replacement Tube Fitting Assembly nut until the needle is gripped securely.
- With the Injection Valve Handle in the LOAD position, dispense the sample from the needle into the Micro Injection Valve and, without removing the needle, move the valve handle from LOAD to INJECT. Note: once in the INJECT position, it is safe to remove the syringe needle from the Replacement Tube Fitting Assembly.
- Remove the syringe needle by simply pulling it out; if met with too much resistance, slightly loosen the Replacement Tube Fitting Assembly nut until the needle can be removed.
- In most cases, all the subsequent uses of the Injection Port Adapter will simply require the insertion and removal of the syringe needle with no adjustment of the Replacement Tube Fitting Assembly nut. In a few cases where extra back pressure may be present, the Replacement Tube Fitting Assembly nut may have to be tightened to prevent sample backflow.